Management
Draft | Approval Workflow | Manage Outstanding Invoices | Email Dispatch, Printing | Paid & Ignored | Bank Reconciliation | Marking & CategorizingDraft
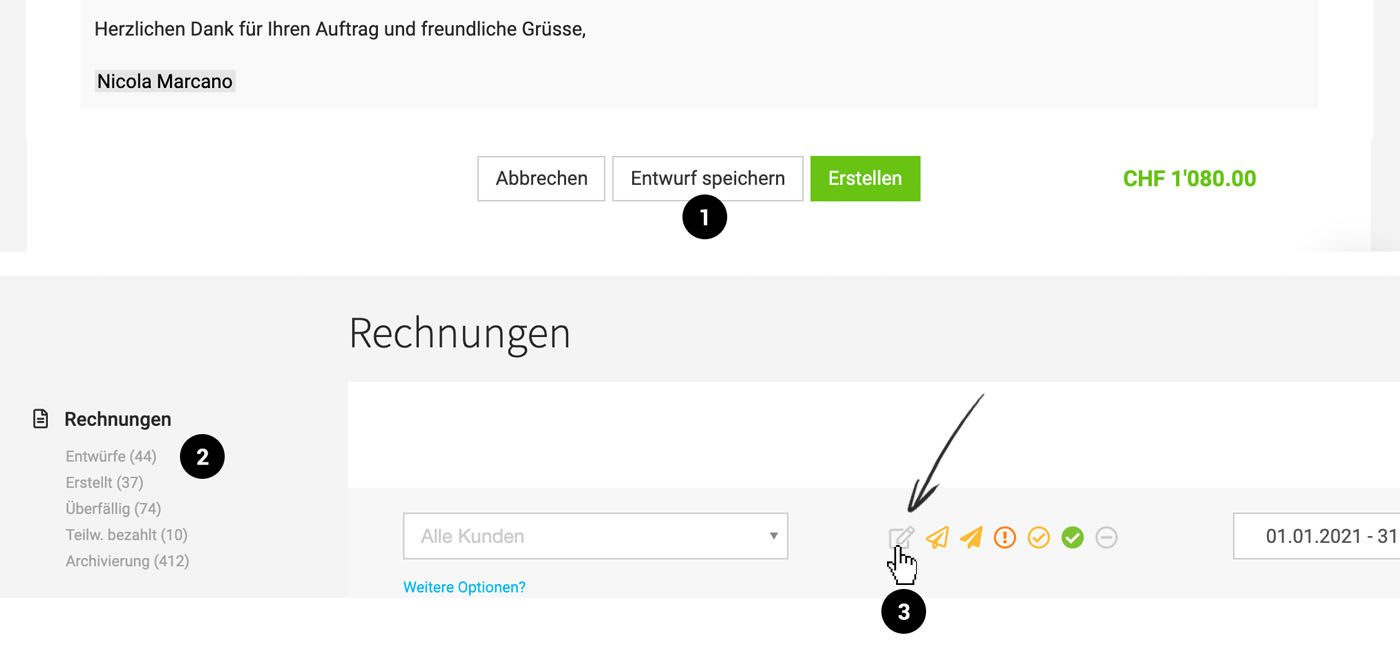
When selecting "Save as Draft" for the invoice instead of "Create", you can prepare invoices without assigning an invoice number yet.
Revenue Forecast: Draft invoices are considered as planned income in the financial reports
 English image not yet available...
Drafts are listed in the Smart Filter "Drafts" (2). To filter by drafts, activate the corresponding status symbol in the filter (3).
Revenue Forecast: Draft invoices are considered as planned income in the financial reports
 English image not yet available...
Drafts are listed in the Smart Filter "Drafts" (2). To filter by drafts, activate the corresponding status symbol in the filter (3).
Bulk Creation of Drafts
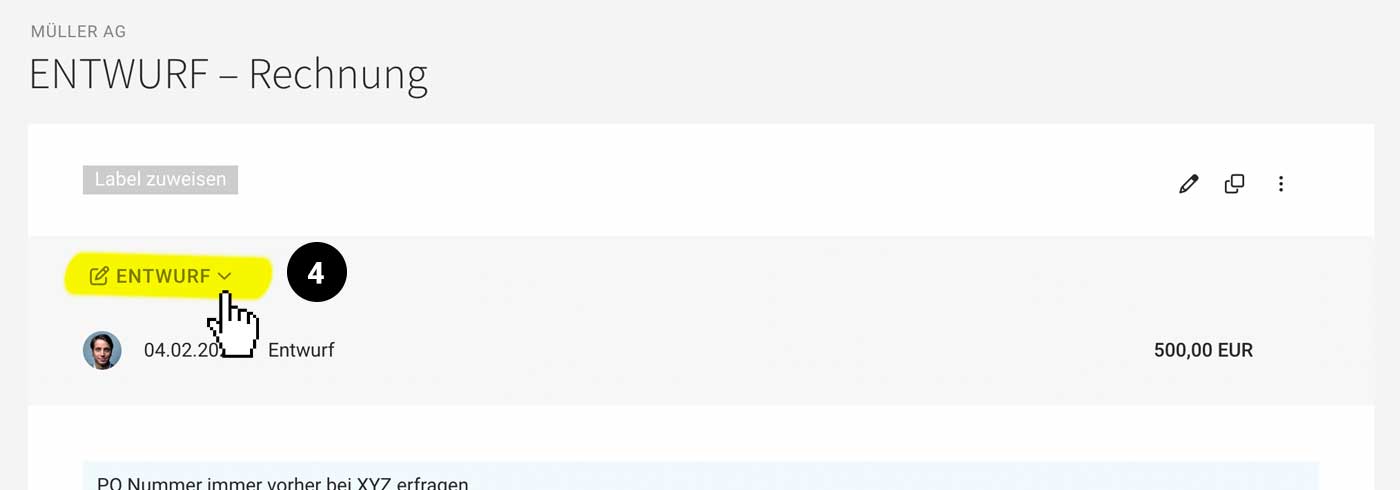
Invoices can be created as drafts using the bulk action – and then reviewed under "Invoicing" > "Drafts" and created with a click (on the invoice page top left: 4).
 English image not yet available...
 English image not yet available...
Approval Workflow
Request Approval Specifically
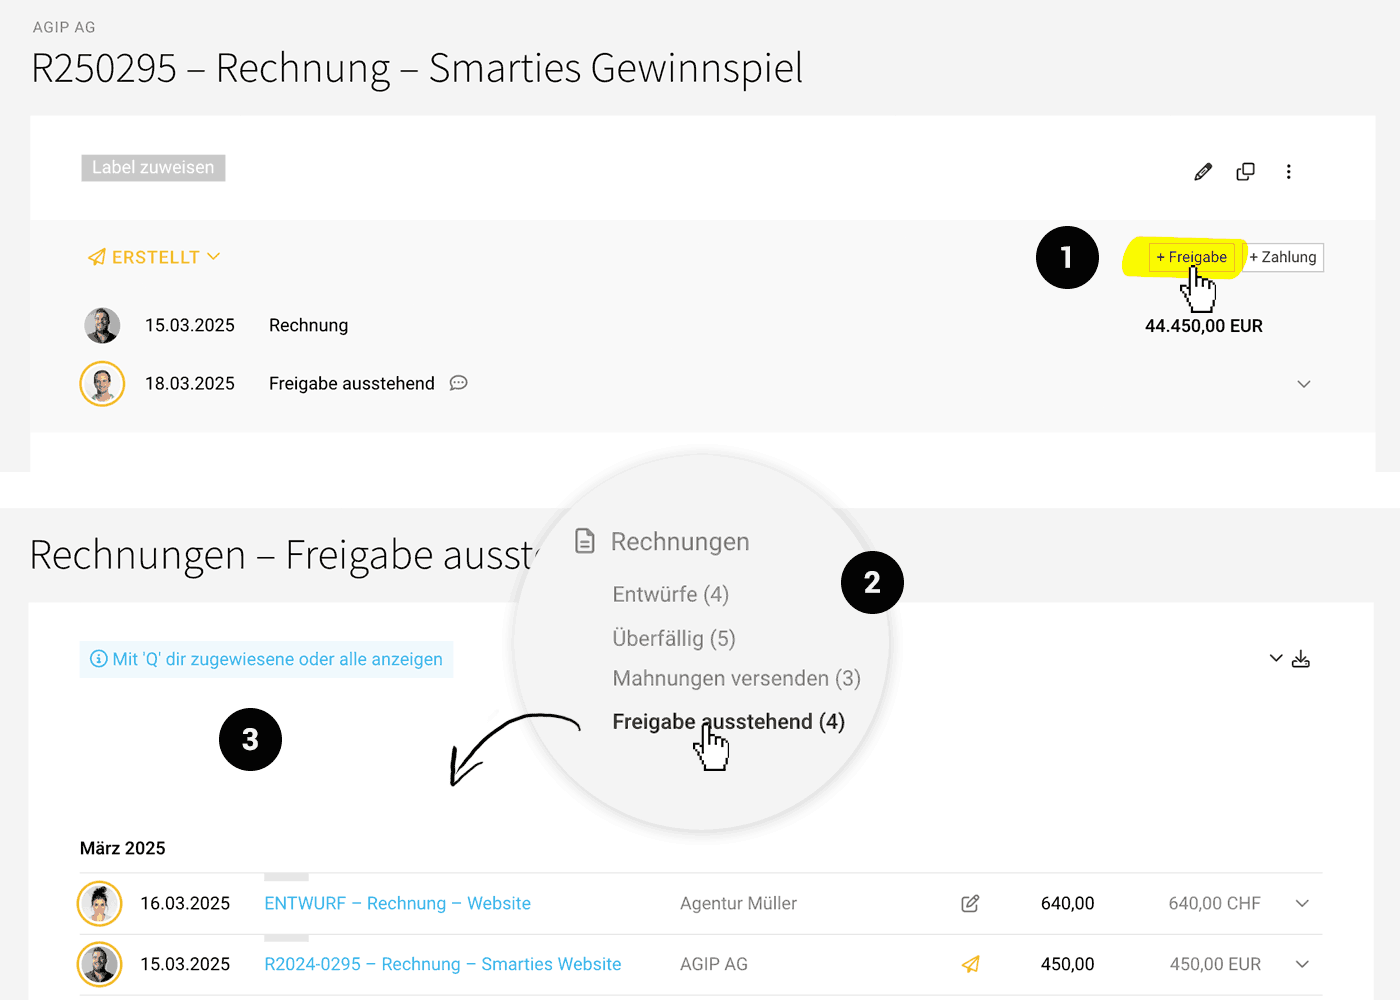
For an invoice in the status "Draft" or "Created," you can request approval using the "Approval" button (1).
 English image not yet available...
The designated person will be notified – through the message inbox or, depending on notification settings, additionally via email. The message links directly to the invoice.
 English image not yet available...
The designated person will be notified – through the message inbox or, depending on notification settings, additionally via email. The message links directly to the invoice.
Automatic Approval Request
In the settings under "Invoicing" > "General," you can set up or adjust automation to automatically create an approval request starting from a customizable minimum amount.
 English image not yet available...
 English image not yet available...
 Pending Approval
Pending approvals are marked in orange in the list. The Smart Filter "Approval Pending" (see above 2) helps you access all requested approvals. To specifically filter your own approval requests, you can use the keyboard shortcut "Q" (see above 3).
Email dispatch remains disabled until the invoice is approved.
Email dispatch remains disabled until the invoice is approved.
Approve or Reject
In the invoice's detail view, it can be approved or rejected with a click (similar to expenditures).
Upon Approval, the person who requested the approval receives a notification, and the invoice is marked in green.
Upon Rejection, the requesting person is also notified, but the invoice is marked in red, and email dispatch remains disabled. You can specifically access all rejected invoices using the Smart Filter "Approval Rejected".
For clarification or correction, participants can use the "Notes & Files" feature, including @mention. Invoices can also be temporarily marked using labels and easily filtered.
Approval or deletion of the approval request is possible at any time.
General Notes
- Multiple approval requests per invoice are possible, either in parallel or sequentially.
- All actions are documented in the comments below the invoice.
- All persons with full or restricted access to invoicing can be addressed.
- Notification options can be customized in your profile.
- Approval requests can be deleted by: the addressed person, the creator, or a person with full access to invoicing.
- Invoices with pending or rejected approval are not offered for accounting export.
Manage Outstanding Invoices
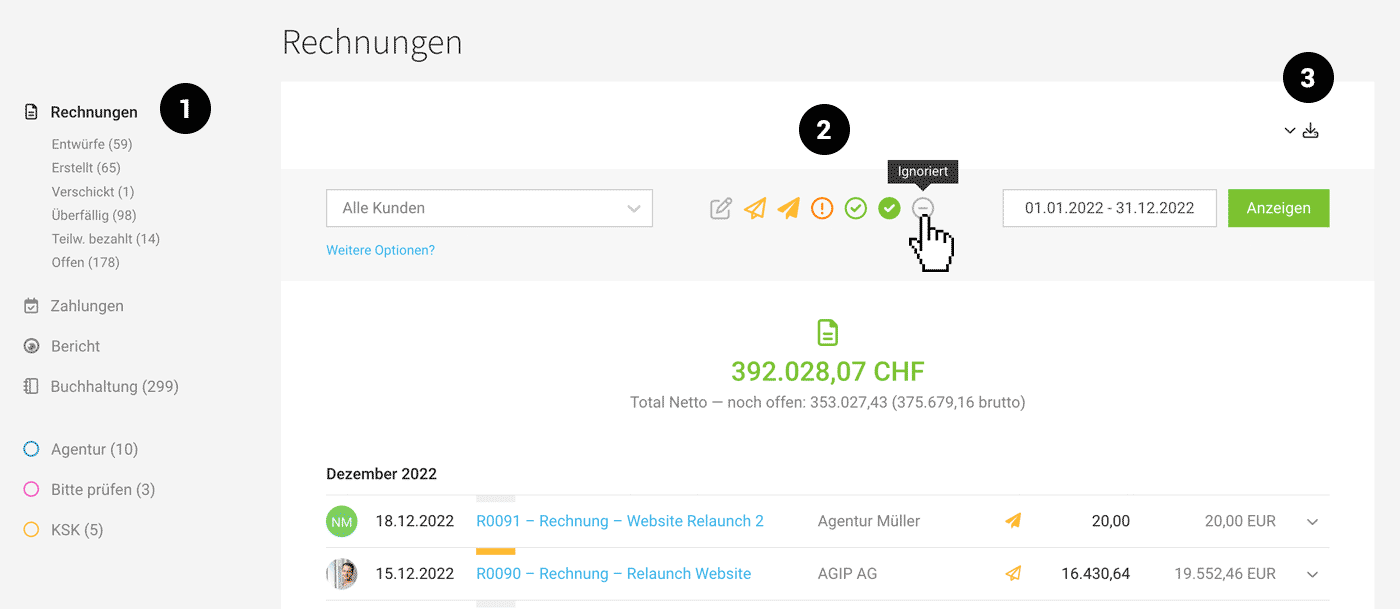
All invoices are listed under "Invoices" (1). In the filter area (2), you can apply individual filters – for example, filter by time period – or include drafts and ignored invoices not considered by the standard filter. A simple export option is available at the top right (3).
» All information on export and accounting exports
Use labels to temporarily mark specific invoices for individual purposes.
 English image not yet available...
» All information on export and accounting exports
Use labels to temporarily mark specific invoices for individual purposes.
 English image not yet available...
Outstanding Invoices
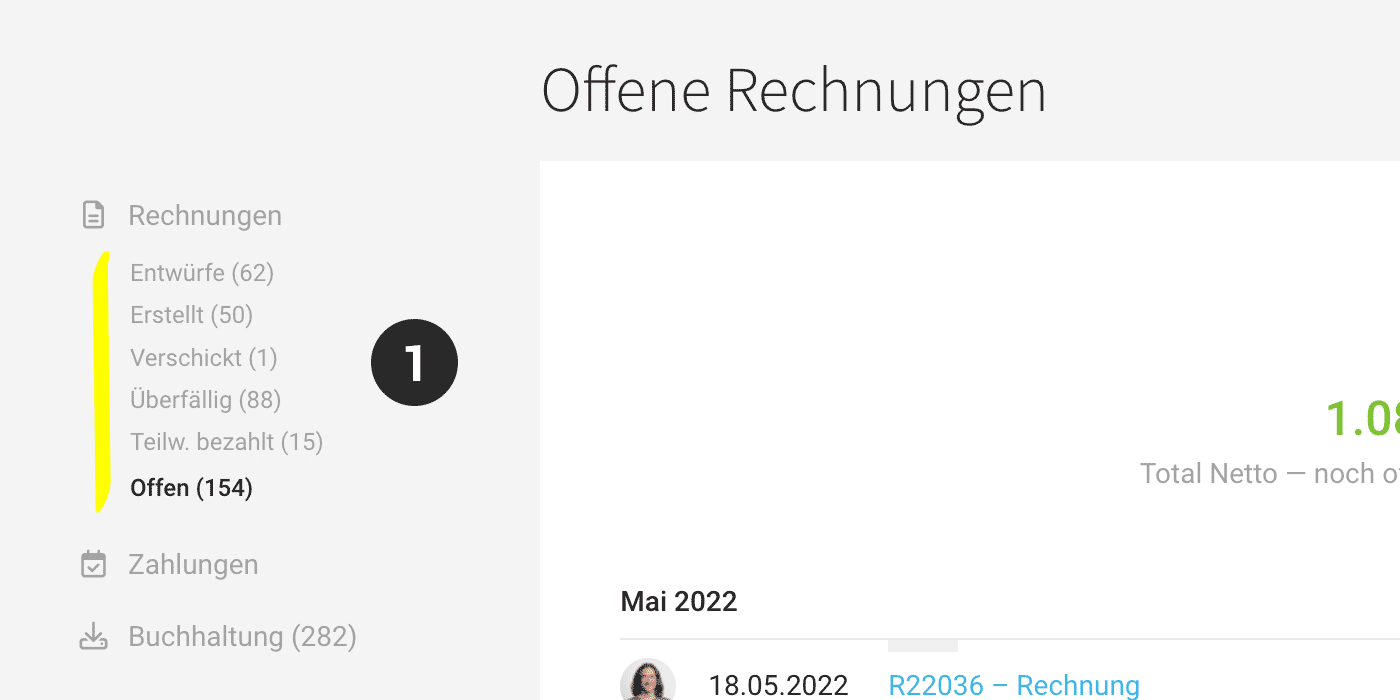
Outstanding invoices can be quickly and specifically displayed using the "Smart Filters":
 English image not yet available...
Created
When saving an invoice with "Create", an invoice number is immediately assigned. Subsequent changes can be tracked via the change log (below the invoice view).
 English image not yet available...
Created
When saving an invoice with "Create", an invoice number is immediately assigned. Subsequent changes can be tracked via the change log (below the invoice view).
Sent
Invoices sent by email are automatically marked as "Sent". If the invoice is sent by mail, manually adjust the status.
Overdue
Once invoices are sent, MOCO checks daily if an invoice is overdue. The invoice is then categorized under "Overdue". If set, the invoice issuer receives a notification.
Partially Paid
If the recorded payment does not match the invoice amount, MOCO offers the "Partially Paid" option. Additional payments can be recorded at any time.
For invoices where payments differ due to discounts, the status "Paid" is the correct choice. The discrepancies are handled accordingly in accounting.
Email Dispatch, Printing
After saving, the document is displayed with the deposited standard letterhead and can be downloaded as a PDF or sent. For dispatch or printing, an alternative letterhead can be selected from the dropdown on the right.
Send documents via MOCO or connect your own mail server.
Send documents via MOCO or connect your own mail server.
Send Individually
Invoices can be sent directly via the detail view using the "Email" button. If you send individual invoices by mail, manually set the invoice status to "Sent". Only in this status is the overdue status checked.
Bulk Dispatch
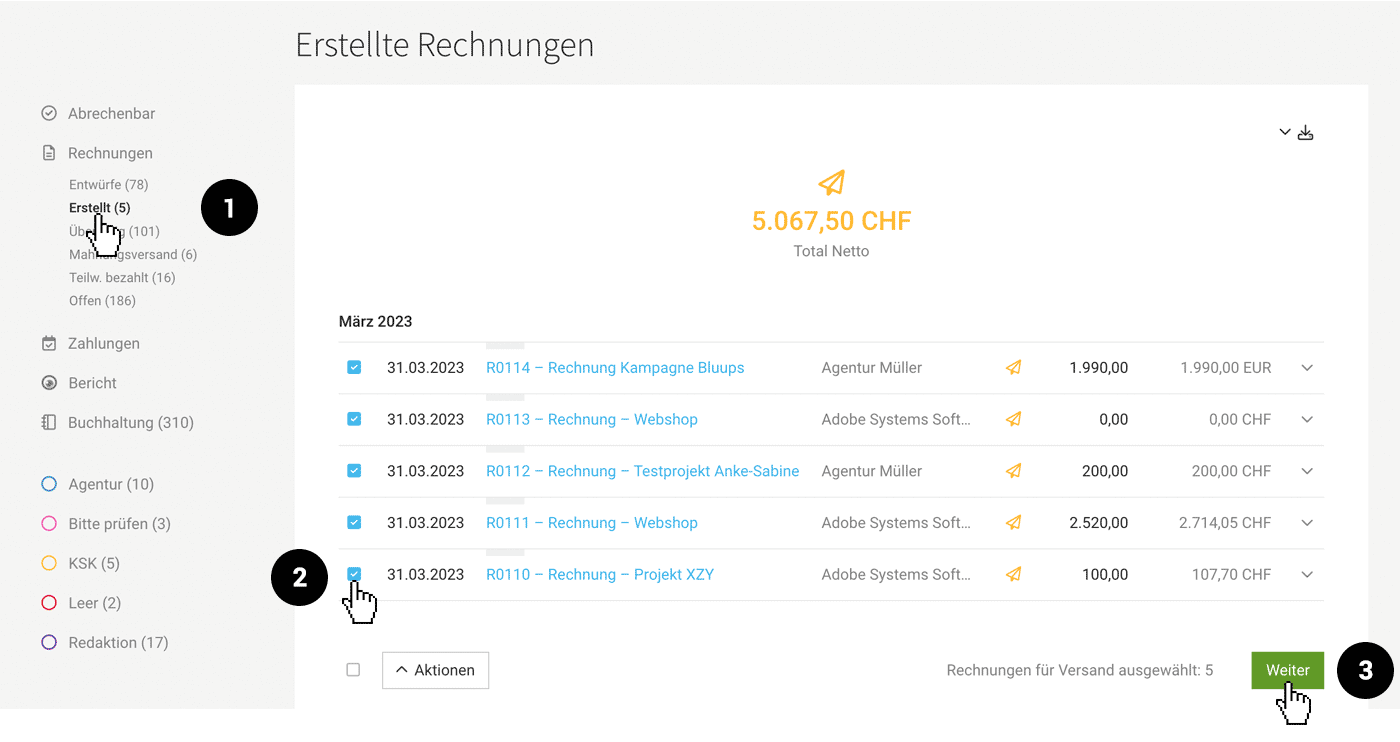
With bulk dispatch, several invoices can be sent at once:
1. Go to "Invoicing" and select the Smart Filter "Created"
2. Select all or individual invoices
3. Click on "Continue" at the bottom right
4. Check dispatch information (Icon Tooltip with Info > Customize > Update)
5. Confirm dispatch
 English image not yet available...
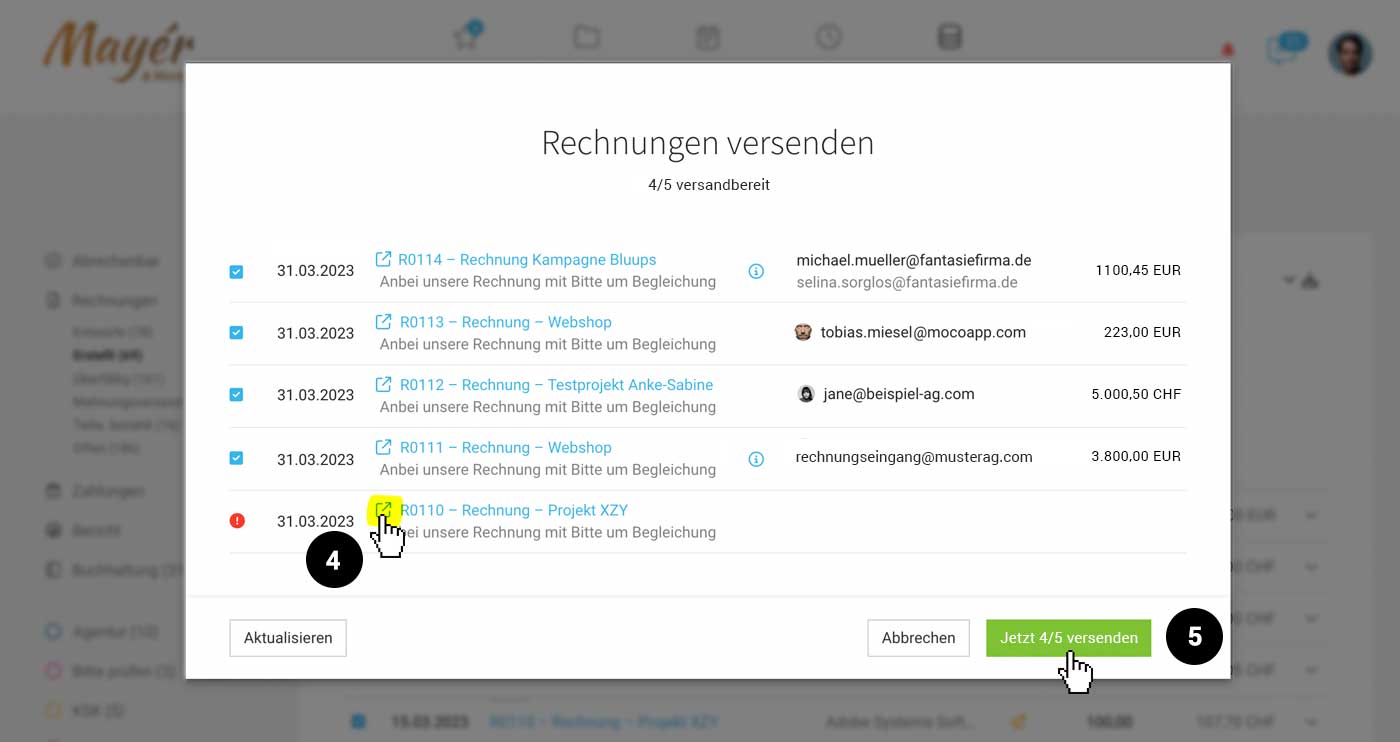 English image not yet available...
1. Go to "Invoicing" and select the Smart Filter "Created"
2. Select all or individual invoices
3. Click on "Continue" at the bottom right
4. Check dispatch information (Icon Tooltip with Info > Customize > Update)
5. Confirm dispatch
 English image not yet available...
 English image not yet available...
Be Well Prepared
To optimally prepare for bulk dispatch, check the following:
- Formulate the standard email text as neutrally as possible (Settings > Invoicing > Invoices)
- If you use the variable "Salutation line" in the standard email text: Adjust the standard salutation if necessary (Settings > Layout > Labels): When setting a contact in the project invoicing information or directly when creating the invoice, the salutation line specified for the contact is preferred.
Printing
Under "Print view", you can select an alternative uploaded letterhead. With the selection "white", the proposal can also be printed on pre-printed letterhead.
Paid & Ignored
Status "Paid"
An invoice is considered paid when the payment (amount + date) has been recorded for the invoice.
Status "Ignored"
The "Ignored" status is intended for invoices that will not be paid but should not remain open. This status can also be assigned manually. An invoice will automatically be set to "Ignored" if it is canceled and no payment has been made. Similarly, the cancellation invoice will be set to ignored.
In accounts receivable management, these invoices are no longer relevant and are therefore excluded from standard filtering.
When preparatory accounting is enabled, they are included in the accounting export. They can also be exported separately and not transferred if needed.
In accounts receivable management, these invoices are no longer relevant and are therefore excluded from standard filtering.
When preparatory accounting is enabled, they are included in the accounting export. They can also be exported separately and not transferred if needed.
Record Payment Manually
Payments are recorded under "Invoicing" > "Payments". Alternatively, the payment can be recorded directly in the invoice view at the top right via the "+ Payment" button (see image).
Search invoices by reference number:
You can search for the reference number (QR invoices/ESR) in MOCO (Shift +7 – or under "Invoicing" in the filter under "More Options").
 English image not yet available...
Search invoices by reference number:
You can search for the reference number (QR invoices/ESR) in MOCO (Shift +7 – or under "Invoicing" in the filter under "More Options").
 English image not yet available...
Batch Payment / Mark Multiple Invoices as "Paid"
Select all or specific invoices, then choose the action "Record Payment".
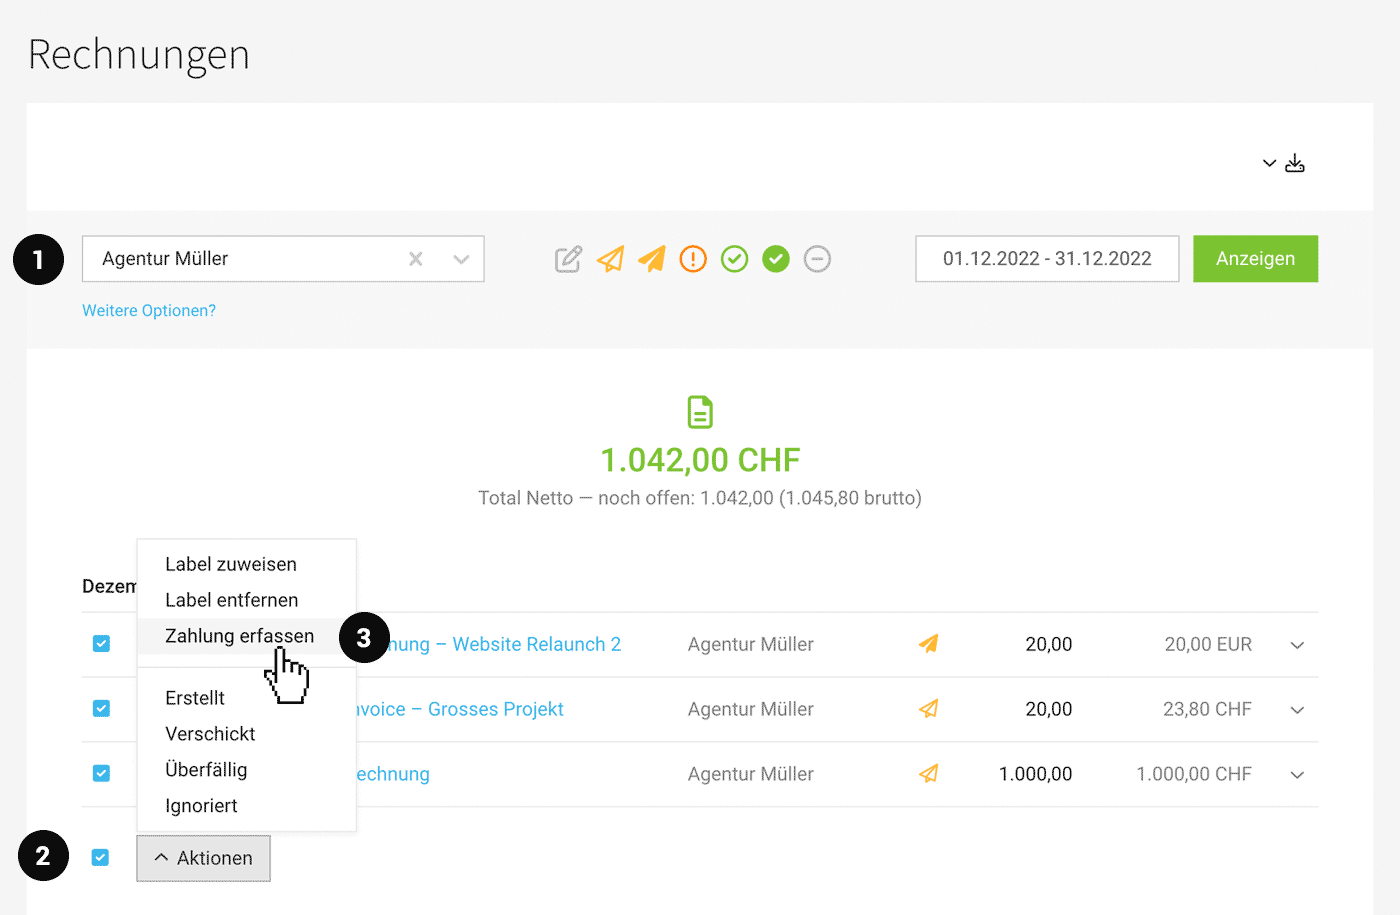 English image not yet available...
 English image not yet available...
Bank Reconciliation
Via Camt File
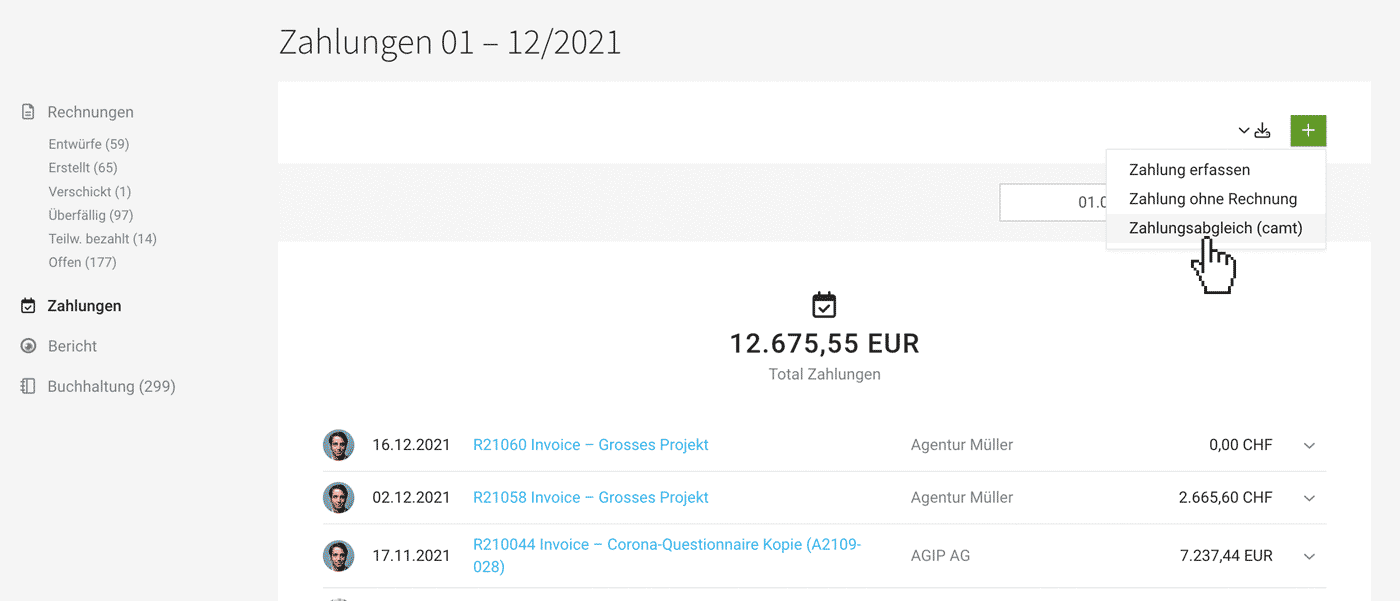 English image not yet available...
Upload Camt File
Under "Payments" at the top right, you can upload the bank's camt file (camt.052, camt.053, and camt.054 files) for automatic payment reconciliation.
For automatically recorded payments, an "i" symbol displays the purpose of use, aiding traceability.
Matching via ESR, Invoice Number, QR Code Reference
For Swiss accounts, the reference number is used for identification.
For all other accounts, the invoice number must be included in the purpose of use to assign the payment to the invoice. If the QR code for invoices is activated, reconciliation can also be ensured via the reference.
Significantly Different Amount
During payment reconciliation via CAMT, MOCO actively alerts you if there is a significant difference between the gross invoice amount and the payment amount in a match. Assuming it's a partial payment, MOCO suggests "Partially Paid" as the status. As a user, you can easily change this to "Paid".
Direct Bank Connection
You can also reconcile your incoming payments directly through the bank connection. Multiple banks (and one or more accounts) can be connected. Payments to invoices are then automatically recorded (and the invoice is marked as paid).
Connect Bank
In the settings, connect your bank(s) and select the accounts.
Connect Bank
In the settings, connect your bank(s) and select the accounts.
Automatic Payment Reconciliation Four Times Daily
The automatic payment reconciliation occurs with an active bank connection and at least one selected account four times daily. You have an overview of all payments under "Invoicing" > "Payments".
No Older Than 3 Months
MOCO recognizes new payment outputs from activation. During each reconciliation, all invoices without payments are checked. Only when invoices or payments are older than 3 months are they no longer considered.
Purpose of Use Crucial for Successful Payment Reconciliation
For a payment to be assigned to the corresponding invoice, the invoice number or purpose of use must match. For automatically recorded payments, this purpose of use is displayed via an "i" symbol, aiding traceability.
Assign Payments Retroactively
If you choose in the settings to collect all payments, MOCO also records payments that cannot be assigned to an invoice. These are listed under "Invoicing" > "Payments" and can be assigned to invoices retroactively if needed:
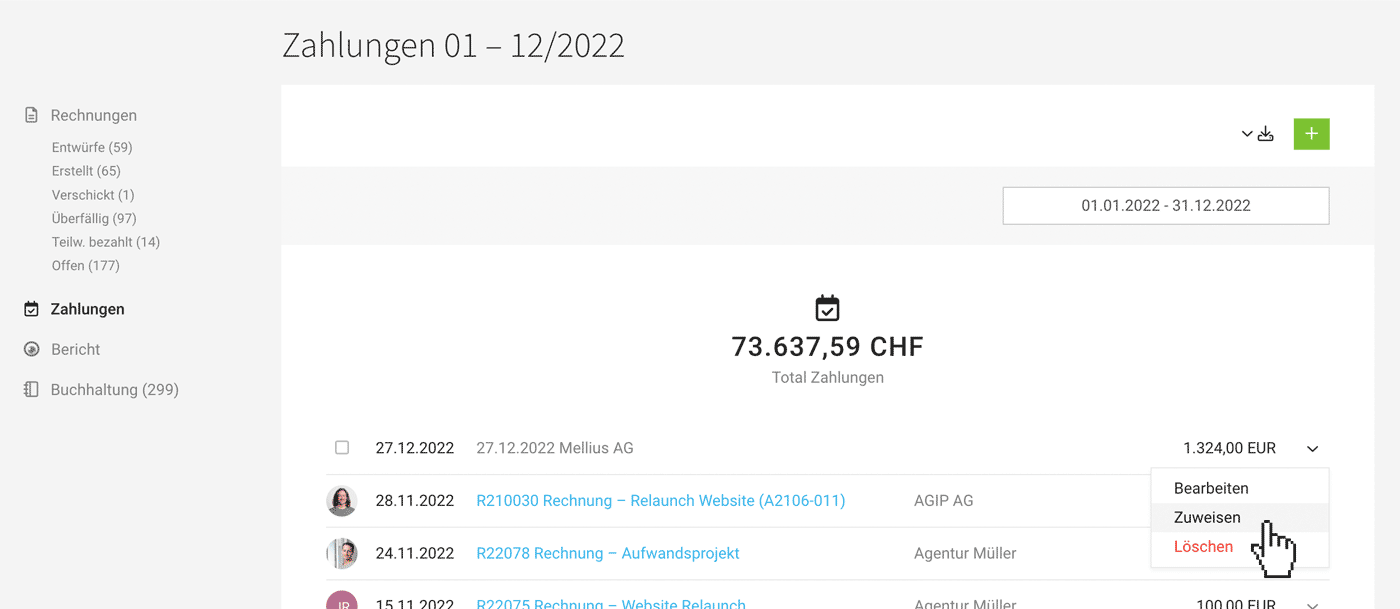 English image not yet available...
Other Income
Payments that do not belong to a MOCO outgoing invoice can remain as they are to reflect the actual cash flow. Payments can also be recorded individually at any time.
Outgoing Payments
If you use digital invoice entry, you can also reconcile expenditures with outgoing payments.
Marking & Categorizing
Labels
Labels can be used to categorize invoices or mark them on a short-term basis. These labels are also part of the Excel export, allowing for further custom evaluations.
» More about Labels
» More about Labels
Custom Fields
Document information can be extended by Custom Fields (visible or invisible in the PDF). They are part of the export and Accounting Export "Neutral (CSV)".
