Review & Complete
Invoice Receipt | Assign Project | Invoice Approval | Payments | LabelsInvoice Receipt
Expenditures > Receipt
The digital invoice receipt collects all expenditure receipts. The workflow entails that all items in the receipt are processed and then moved to the archive. The accounting export is independent of this.
The Inbox Zero Principle
The "Receipt" is your to-do list that needs to be completed. The goal is to reduce the receipt count to zero.
Process and move to the archive
At the time of invoice recording, information such as "Can the invoice be assigned to a project?" or the document is not sufficient is often missing. Once all necessary points for the respective expenditure have been checked off, it is moved to the archive.
Following points need to be checked depending on the expenditure
✅ Receipt recorded?
✅ Supplier recorded? (not necessary for small invoices like taxi rides, restaurants, groceries, etc.)
✅ Approval granted? (Approval process optional)
✅ Approval granted? (Approval process optional)
✅ Payment recorded? (only then is the gross amount considered in the cash flow)
✅ Project or planned expenditure assigned? (Assignment)
✅ Budget chosen? (Budgets or cost centers)
✅ Category assigned? (Categories/Expense accounts)
✅ Budget chosen? (Budgets or cost centers)
✅ Category assigned? (Categories/Expense accounts)
Smart Filters help with processing
MOCO points out something unprocessed through the Smart Filters (1). The relevant expenditures can thus be accessed with a click.
 English image not yet available...
English image not yet available...Standard Filters & Labels
- The standard filter (2) can also be accessed via keyboard shortcut "F". With keyboard shortcut "Q" you can filter the list for all expenditures where you are assigned as the responsible person.
- Customizable Labels (3)
Drafts & Personal Expenses Invoicing
Automatically recorded receipts wait in the inbox as drafts for their review
With a click on the Smart Filter "Drafts" (1) you can filter for all expenditures that have been received but not yet recorded. With activated AI text recognition (OCR), the drafts are already read with the amount.
If you have enabled personal expense recording for your employees, the submitted personal expense invoices also wait here for approval. With the approval, the company expenditure is created.
- With a click, you can filter through the Smart Filter "Personal expenses" (1) accordingly.
- After approval, you can reimburse the amount to the employee via the transfer order

Assign Project
Assign Expenditure to a Project
Recorded expenditures/incoming invoices can be assigned to a project via the list by clicking the link icon (see illustration). This is for further billing (receipt can be selected as an attachment) and/or cost tracking. The expenditure is linked and traceable within the project.
 English image not yet available...
Using the Smart Filter "Unassigned", you can quickly view all expenditures that have not yet been assigned. If you want to exclude certain items from assignment directly, mark them and choose the mass action "No Assignment" below.
English image not yet available...Using the Smart Filter "Unassigned", you can quickly view all expenditures that have not yet been assigned. If you want to exclude certain items from assignment directly, mark them and choose the mass action "No Assignment" below.
Assign to an Existing Additional Service
When assigning the expenditure, choose the project and additional service (e.g., already taken from the proposal). The costs of the additional service are updated and the receipt is recorded. The already set (sales) price remains unchanged!
- To offer the additional service, the expenditure assignment must be active.
- Select "Assign & Complete" if no further expenditure items are to be assigned. This will deactivate the expenditure assignment.
Set Default
Whether the expenditure assignment for newly created additional services is active or inactive can be predefined under Settings > Projects.
Example of a Flat Rate for Incidental Costs:
An additional service with a flat rate is already created in the project (prior adoption from the proposal is possible). All associated costs from personal expenses and incoming invoices are now assigned. The costs accumulate and the receipts are collected. In the end, this position can be included in the invoice as planned – but it doesn't have to be.
Planned Expenditure
If you use expenditure planning, you can also directly plan the project expenditure for your company (forecast) and control the assignment of the incoming invoice through the additional service. Learn more about planned expenditures
Create a New Additional Service
With the assignment, you can also automatically create the additional service in the project. In this step, you can choose whether the project management should be notified.
By creating an additional service, you directly book a new service to the project. The expenditure is traceably linked. Through the linkage, the costs (purchase price) and the receipt are recorded. Likewise, the price (sales price to the client) is captured. This can be adjusted later in the project. If a general markup directly at assignment is preferred, it can be defined in the settings.
By creating an additional service, you directly book a new service to the project. The expenditure is traceably linked. Through the linkage, the costs (purchase price) and the receipt are recorded. Likewise, the price (sales price to the client) is captured. This can be adjusted later in the project. If a general markup directly at assignment is preferred, it can be defined in the settings.
Assign an Expenditure to Multiple Projects
Multiple positions can be recorded for an expenditure and thus assigned to different projects. Learn more
Assign Multiple Expenditures to an Additional Service
Multiple expenditures can be assigned to an already created additional service (e.g., position flat rate for incidental costs).
Undo Assignment
a) On the expenditure via the unlink icon
b) In the project, select "Remove Expenditure" (dropdown in the list of additional services - or unlink icon in the detail view - in image No. 5). This only dissolves the assignment. Alternatively, completely delete the additional service in the project.
The expenditure item can then be reassigned.
Tip for fewer clicks: Click on the project name while holding down the cmd or apple key on the expenditure. This opens the project in a new tab. Make adjustments, close the tab. Back at the expenditure, briefly reload the page.
No Assignment
If certain expenditures should not be assigned, you can set them to "No Assignment". They will also be excluded from the Smart Filter "Unassigned", which indicates expenditures that have not yet been assigned.
Invoice Approval
Requesting an invoice approval is optional. Here's how the approval workflow functions:
Request Approval
Set Automation from Minimum Amount
In the settings, you can define from which amount a specific person should automatically approve the expenditure.
Request Approval Individually
You can initiate the invoice approval either on the invoice detail page (1a) or from the list via the dropdown (1b).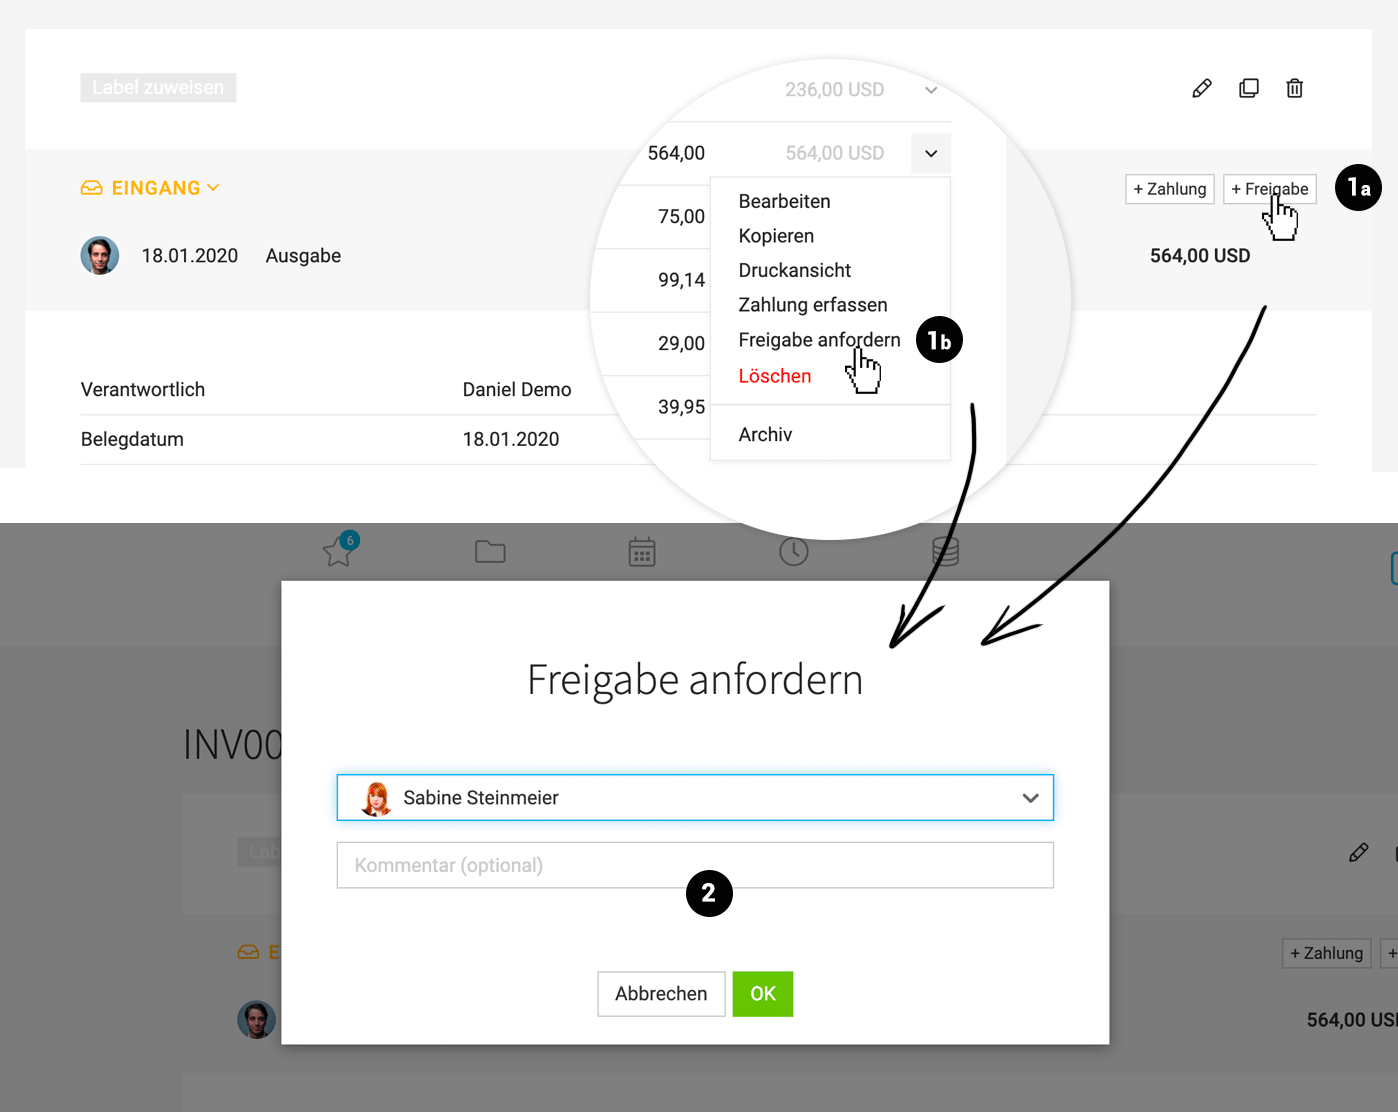 English image not yet available...
In the settings, you can define from which amount a specific person should automatically approve the expenditure.
Request Approval Individually
You can initiate the invoice approval either on the invoice detail page (1a) or from the list via the dropdown (1b).
English image not yet available...→ All individuals with full or restricted access to expenditures can be addressed.
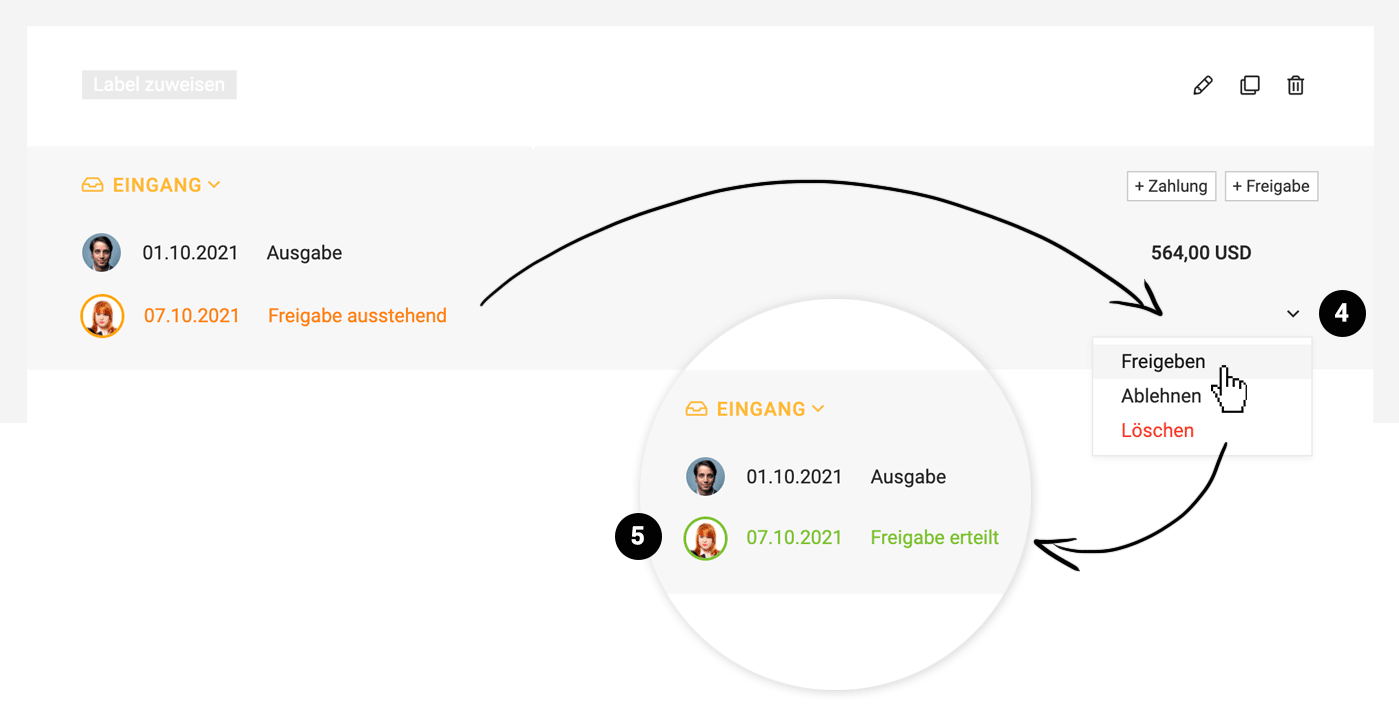
→ The expenditure is marked in orange in the list.
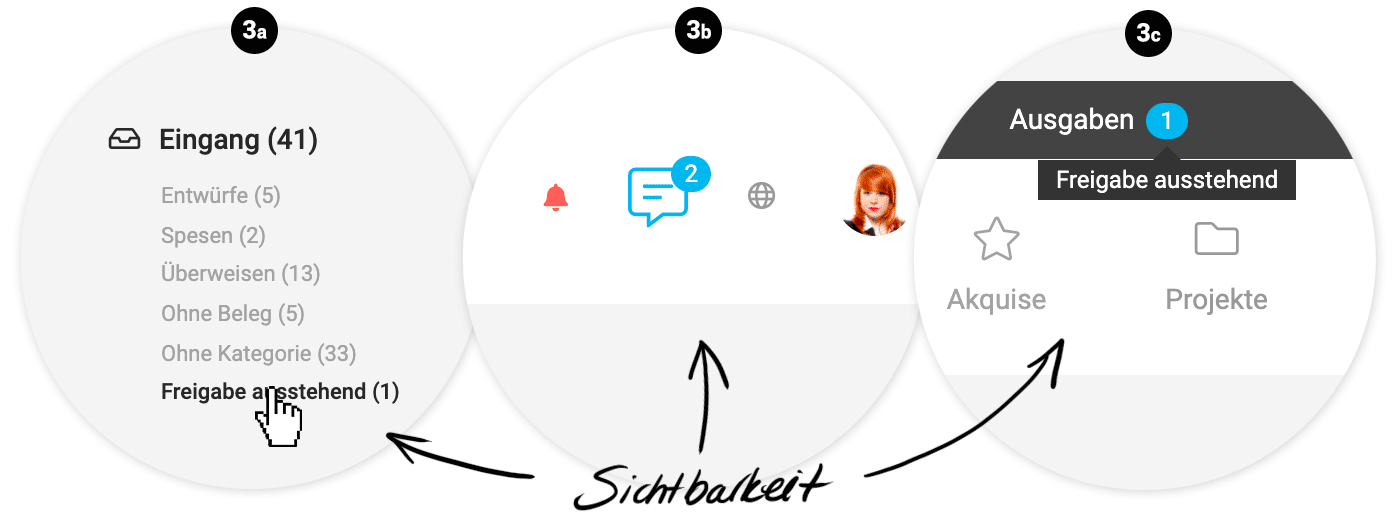
→ You can filter for pending approvals using the new Smart Filter (3a).
→ With a comment (2), you can specify what the approval is about: e.g., checking the invoice or project assignment for further billing/cost tracking.
→ With a comment (2), you can specify what the approval is about: e.g., checking the invoice or project assignment for further billing/cost tracking.
The Addressed Person is Notified
The addressed person is made aware of the newly requested approval in various ways:
 English image not yet available...
→ They receive a message with the comment (notification options adjustable in the profile). It links to the expenditure (3b).
→ The number of pending approvals is also highlighted to a person via the "blue pill" (3c).
→ The Smart Filter can also be used to filter for requested approvals (3a). Using the keyboard shortcut Q reduces it to one's own.
English image not yet available...→ They receive a message with the comment (notification options adjustable in the profile). It links to the expenditure (3b).
→ The number of pending approvals is also highlighted to a person via the "blue pill" (3c).
→ The Smart Filter can also be used to filter for requested approvals (3a). Using the keyboard shortcut Q reduces it to one's own.
Approve or Reject
The addressed person reviews the invoice and can select "Approve" at the top of this detail view (4).
 English image not yet available...
→ Only the addressed person can do this. The approval becomes active immediately and usually requires no further comments. If needed, a comment can be left below the invoice, or another person can be notified.
→ The expenditure is marked with a green circle in the list (5).
→ The initiator is notified about the approval.
Reject Approval / Wrong Contact Person / Delete Approval Request
→ The addressed person can select "Reject" (4) and enter a reason/comment. The initiator is notified accordingly and can request a new approval from another person.
→ If the addressed person wants to indicate they are the wrong contact, they can do so below via a notification.
→ An approval request can be deleted at any time by a person with full access to "Expenditures".
The steps are documented in the history below the invoice by MOCO.
English image not yet available...→ Only the addressed person can do this. The approval becomes active immediately and usually requires no further comments. If needed, a comment can be left below the invoice, or another person can be notified.
→ The expenditure is marked with a green circle in the list (5).
→ The initiator is notified about the approval.
Reject Approval / Wrong Contact Person / Delete Approval Request
→ The addressed person can select "Reject" (4) and enter a reason/comment. The initiator is notified accordingly and can request a new approval from another person.
→ If the addressed person wants to indicate they are the wrong contact, they can do so below via a notification.
→ An approval request can be deleted at any time by a person with full access to "Expenditures".
The steps are documented in the history below the invoice by MOCO.
Other Options
→ Assign Responsible Person
In the expenditures form, another responsible person can be chosen. The person is notified (if set in the profile) and/or can filter for the invoices to be approved using the Smart Filter (see 1st image 3a).
→ Use Labels
With labels, certain invoices can be quickly and specifically marked. Name the labels clearly to indicate what needs to be done – "Receipt missing", "Assign project", "Invoice incorrect", etc. You can filter by labels via the side navigation.
→ Notify Another Person
With the notification function @name, you can inform/communicate about an expenditure.
Payments
Your Expenditures Inbox collects incoming invoices and personal expenses. Here, we display the payment options for various methods such as bank transfer, credit card payment, PayPal, and direct debit.
Display & Payment Methods
Open – Payment Date Missing – Paid
Open = Display Payment Deadline
An expenditure is shown as open if it involves a personal expense report or if bank transfer is chosen as the payment method.
Payment Date Missing = Light Green Dot
The light green dot in the list indicates that the actual payment date (debit date from the business account) is still missing. Only with the amount and payment date will these expenditures appear in the cash flow analysis. This affects the payment methods credit card, direct debit (including EC), PayPal, and cash.
Paid = Green Dot with Checkmark
The expenditure is fully paid or the payment has been recorded.
Bank Transfer
Personal Expenses and Incoming Invoices to be Transferred
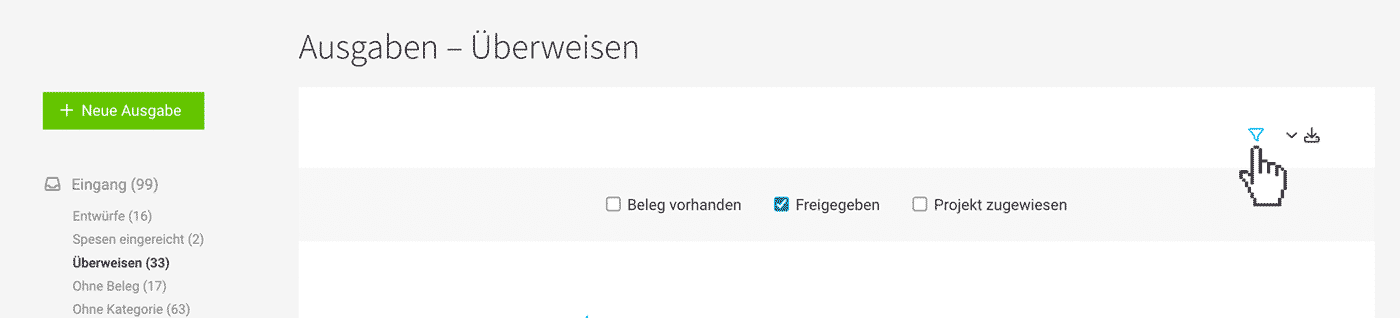
To settle invoices and reimburse personal expense reports, you can use the transfer order, let expenditures be automatically reconciled, or record the payment manually. The Smart Filter "Transfer" directly filters for items to be transferred. Additional filter options are available via the filter ("F" or click on the filter icon).
 English image not yet available...
English image not yet available...Create Transfer Order
With MOCO, you can create SEPA transfer orders and execute them through online banking.
- The payment is scheduled in online banking for one day (or the business day) before the payment deadline.
- The payment arrives on time at the supplier.
- Batch payments instead of individual payments are selectable.
- MOCO also automatically sets the expenditure to Paid in MOCO (= records the payment on the due date). If you use automatic payment reconciliation via bank connection, the payment is confirmed. These actions are recorded through a comment in the expenditure history and remain traceable for you.
Preliminary Steps
Enter the business account details in the settings under "Account" > "Currency & Account", for all suppliers the IBAN, and if personal expense reports are to be settled, also for your personnel the IBAN.
Create Transfer Order
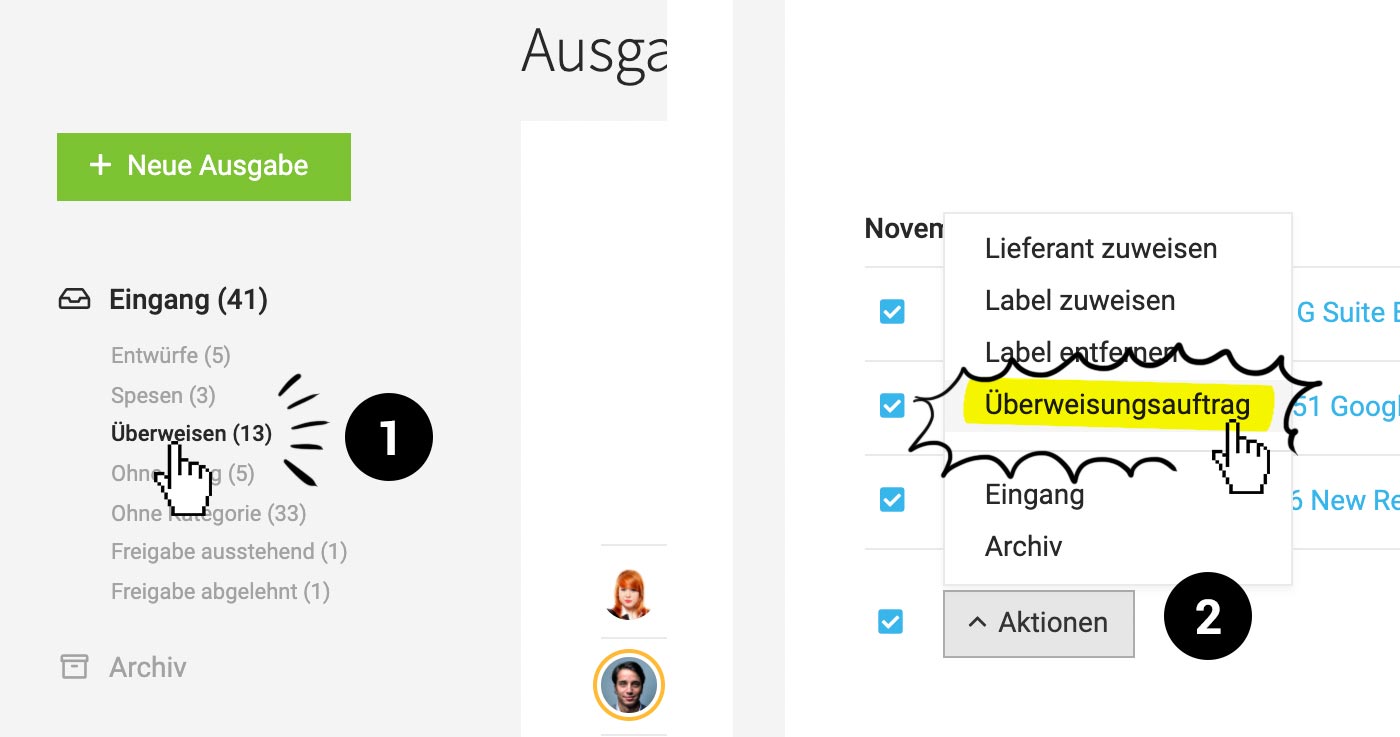
1. Use the Smart Filter (1) to filter for all expenditures to be settled by transfer. Personal expense reports are also considered.
 English image not yet available...
2. Select the multiple action "Transfer Order" (2) or choose "Transfer Order" from the dropdown for a single expenditure.
Enter the business account details in the settings under "Account" > "Currency & Account", for all suppliers the IBAN, and if personal expense reports are to be settled, also for your personnel the IBAN.
Create Transfer Order
1. Use the Smart Filter (1) to filter for all expenditures to be settled by transfer. Personal expense reports are also considered.
English image not yet available...2. Select the multiple action "Transfer Order" (2) or choose "Transfer Order" from the dropdown for a single expenditure.
3. MOCO checks if all details for a successful transfer are present.
4. After supplementing any missing details (linked expenditure opens in a new browser tab), refresh the view.
5. Upon confirmation with "OK", a transfer order (xml file) is created for all selected expenditures.
6. Then upload the xml file in online banking.
Retrieve Transfer Orders Later
All created transfer orders are traceable with the relevant invoices under "Payments": List of all created transfer orders, included invoices (list & Excel export), XML for re-download.
Payment Reconciliation
a) via Direct Bank Connection
You can also reconcile your payment outflows directly via the bank connection. Multiple banks (and one or more accounts) can be connected. Payments for expenditures are then automatically recorded (and the expenditure is marked as paid).
- Connect Bank: In the settings, connect your bank(s) and select the accounts.
- Automatic Payment Reconciliation Four Times Daily: After activation, MOCO regularly checks via finAPI if there are payments for created expenditures. The prerequisite for recognition is the matching of the amount and a clear assignment via reference, invoice number, or IBAN.
Currently, only open expenditures are reconciled, or assignable payments are recorded in MOCO. This development step ensures that unwanted payroll or other sensitive expenditure items do not appear with full access under "Payments". Ultimately, the development goal is to have all payment outflows recorded to address missing receipts. - Entry & Archive + Not Older Than 3 Months: MOCO recognizes new payment outflows from activation. During each reconciliation, all expenditures (in entry & archive) without payments are checked. Only when expenditures or payments are older than 3 months are they no longer considered.
- Confirmation of Recorded Transfer Orders: Payments already recorded by a transfer order in MOCO are confirmed with the payment reconciliation. MOCO records a corresponding comment on the expenditure.
b) via Camt File
Under "Payments" at the top right, the Camt file (camt.053 and camt.054 file) from the bank can be uploaded for automatic payment reconciliation. Payments for expenditures are then automatically recorded (and the expenditure is marked as paid).
- Criteria for Assignment: For identification, the invoice number and reference are crucial.
- Deviating Amount
During payment reconciliation via Camt, MOCO actively indicates if the gross invoice amount and payment amount differ too much in a match. Assuming that a lower amount is a partial payment, MOCO suggests "Partially Paid" as the status in the modal during reconciliation. As a user, this can be confirmed or removed.
Record Payment Manually
Payments can also be recorded manually. To do this, click on the status icon under "Expenditures" or in "Supplier" (1) or directly record the payment via the button at the top right of the expenditure (2).
Display All Expenditures Without Recorded Payment
Under "Payments" via the "+" all open receipts for payment recording are offered, and you can directly search for an invoice. (3)
 English image not yet available...
Partial Payment
If a partial payment is recorded, MOCO automatically suggests the status "Partially Paid". All partially paid expenditures can be accessed with one click via the Smart Filter "Partially Paid".
Record Batch Payment
See further below "Set All or Multiple Invoices to Paid"
Record Payments with One Click
See further below "Set All or Multiple Invoices to Paid"
 English image not yet available...
Credit Card
Credit Card Integration
Comprehensive integration offering a sync of credit card payments and receipts!
Synchronize credit card payments including receipts with MOCO
 English image not yet available...
Synchronize credit card payments including receipts with MOCO
English image not yet available...Manually Reconcile Credit Card Statement
The credit card provider debits the sum from the business account monthly. This is the effective payment date for your cash flow.
1. Switch to the "Payments" section (see image above – 3)
2. Select payment method "Credit Card" and the month concerning the account debit.
3. Now individually record the payments at the top right via the "+" (choose the debit date of the credit card statement from the business account as the date) and check off on the credit card receipt.
4. At the end, the sum in the filtered view should exactly match the credit card statement.
4. At the end, the sum in the filtered view should exactly match the credit card statement.
Additional Options
Set All or Multiple Invoices to "Paid"
This option is helpful if you manage all payments in DATEV, for example, and want to quickly set invoices to paid collectively: Select all or specific expenditures and choose the action "Record Payment" at the bottom left.
 English image not yet available...
English image not yet available...Record Other Payments
In principle, a pure payment without a receipt can also be recorded under "Payments". This then affects the sum of payment outflows or the cash flow report.
A subsequent expenditure can be assigned to payments without a receipt (dropdown right "Assign")
 English image not yet available...
A subsequent expenditure can be assigned to payments without a receipt (dropdown right "Assign")
English image not yet available...Labels
As known from other areas, one can create labels for incoming invoices and thus individually categorize them or mark them on a short-term basis.
To manage or assign labels, click on the small gray bar in the row.
Multiple incoming invoices can be marked at once by selection (see image).
 English image not yet available...
To manage or assign labels, click on the small gray bar in the row.
Multiple incoming invoices can be marked at once by selection (see image).
English image not yet available...